There’s something truly magical about pulling a crusty, fragrant loaf of Pain au Levain from your own oven. That iconic French sourdough, with its complex tang, chewy crumb, and deeply caramelized crust, feels like the pinnacle of home baking. It might seem daunting, perhaps reserved for seasoned artisans, but I truly believe that creating authentic Pain au Levain is within reach for any dedicated home baker. It’s an art, yes, but one built on understanding a few key principles, embracing the rhythm of fermentation, and developing a little intuition along the way. Think of it as a rewarding journey, a delicious dance between simple ingredients and the patient magic of time.
Understanding Your Sourdough Tools: Starter and Levain
Before we dive into mixing dough, let’s clear up a common point of confusion: the difference between a sourdough starter and a levain. Your sourdough starter – sometimes called the ‘chef’, ‘mother dough’, or lievito madre – is the living culture of wild yeast and bacteria you nurture over time. It’s a continuous entity, fed regularly (refreshed) with flour and water to keep it active and happy. You always keep a portion of your starter back, ensuring its perpetuity. It’s the heart of all your sourdough adventures, a living ingredient you maintain.
A levain, on the other hand, is essentially a purpose-built preferment, created specifically for the loaf you intend to bake that day. Think of it like this: you build it by taking a small amount of your ripe, active starter and mixing it with a calculated amount of fresh flour and water, letting it ferment for a specific time (often several hours, like 5-12 hours depending on the recipe and temperature) until it’s bubbly and ready. Unlike the mother starter, the entire levain typically goes into your final dough. It’s a tailored ‘booster’ dose of leavening power and flavour, prepared just for the occasion. Understanding this distinction is more than just terminology; it’s the first step towards controlling the outcome of your bake, as detailed by The Perfect Loaf.
So why bother with this extra step? I’ve found that building a levain offers two significant advantages, especially for crafting authentic Pain au Levain. Firstly, it allows you to easily scale the amount of preferment needed for your recipe without having to maintain a huge mother starter – very practical for home baking! Secondly, and perhaps more excitingly, it gives you precise control over the flavour profile of your final loaf. By adjusting the types of flour in your levain – maybe adding some whole wheat or rye, as these feed the culture differently and impact acidity – you can nudge the flavour towards more complex notes. Conversely, using mostly white flour can yield a milder tang. Some bakers even employ a ‘double-fed levain’ technique, feeding the levain twice before using it, specifically to encourage yeast activity over bacterial fermentation, aiming for that characteristically mild tang found in styles like the famous Poilane-style sourdough.
Crafting the Perfect Dough
With our levain bubbling away, let’s talk about the main dough. The beauty of Pain au Levain often lies in its simplicity: flour, water, salt, and the levain itself. However, the type of flour matters immensely. While recipes vary, many classic French styles favour a base of white bread flour. A moderate protein content (around 11.5% is often suggested for achieving good structure in breads like baguettes, as noted by The Perfect Loaf) helps achieve that balance of strength and extensibility – the dough’s ability to stretch. But don’t feel locked in! Many wonderful Pain au Levain recipes incorporate a portion of whole grain flour, like whole wheat or rye. Comparing recipes from masters like Hamelman and Reinhart shows this flexibility – Hamelman often uses rye for its robust flavour, while Reinhart might opt for whole wheat, each lending a unique character, as explored on The Fresh Loaf. Even all-purpose flour can work, though you might need to adjust hydration slightly as it absorbs less water than bread flour. Experimenting here is definitely part of the fun!
Before we get to serious mixing, many bakers employ a wonderful technique called ‘autolyse’. It sounds fancy, but it’s incredibly simple: you mix just the flour and water from your recipe and let it rest, typically for 20 minutes to an hour (sometimes longer, depending on the flour and recipe), before adding the levain and salt. During this rest period, the flour fully hydrates, enzymes (like amylase) begin their work breaking down starches into simpler sugars (great food for the yeast later!), and gluten development starts passively. As Culture Levain explains, this simple step makes the dough more extensible (stretchy), easier to handle, and can actually reduce the amount of active kneading required. It also contributes to a better crumb structure and potentially deeper flavour – all fantastic benefits for our Pain au Levain.
Once the autolyse is complete, it’s time to incorporate the ripe levain and salt and begin developing the gluten structure. This network of proteins is what traps the gases produced during fermentation, giving the bread its rise and structure. You can achieve this through traditional kneading on the counter (perhaps using the energetic ‘slap and fold’ method where you literally slap the dough down and fold it over) or by employing a series of ‘stretch and folds’ in the bowl during the first part of fermentation. Stretch and folds involve gently stretching a portion of the dough up and folding it over itself, repeating this around the bowl several times; it’s a gentler way to build strength. Don’t be afraid of working the dough; achieving good gluten development is key. Some insights from French baking courses even suggest that longer, controlled mixing can enhance extensibility. You can check for good development using the ‘windowpane test’ – gently stretching a small piece of dough. If you can stretch it thin enough to see light through it without tearing, your gluten is well-developed. If you’re new to sourdough, you might find recipes with slightly lower hydration (say, around 70-76% water relative to flour weight) easier to handle initially. A dough that isn’t overly sticky can make the kneading and shaping process feel much more manageable, as ChainBaker highlights.
The Magic of Fermentation
Now comes the part where patience truly becomes a virtue: fermentation. This is where the real magic happens, where the yeast and bacteria in your levain get to work, transforming the simple dough into something complex and flavourful. The first stage is called ‘bulk fermentation’ – essentially, the dough’s first rise after mixing, before shaping. During this time, typically lasting several hours at room temperature (or much longer if refrigerated), the microorganisms consume sugars and produce carbon dioxide (which makes the dough rise and creates that airy crumb) and organic acids (like lactic and acetic acid, which create that signature sourdough tang and complex flavour). As Bake Magazine emphasizes, this extended fermentation is absolutely crucial for developing the taste, texture, and aroma that distinguishes artisan bread like Pain au Levain from quickly made commercial loaves.
Time and temperature are the two most critical levers you can pull to influence fermentation. Warmer temperatures (think a cozy room) speed things up, while cooler temperatures (like your refrigerator) slow things down dramatically. Many experienced bakers aim for a specific Desired Dough Temperature (DDT), often around 23-24°C (74-75°F), right after mixing to achieve predictable fermentation times, as discussed by Serious Eats. Don’t worry, you don’t need special equipment for this! As a home baker, you can easily influence this by using slightly warmer or cooler water when mixing your dough. A popular and highly effective technique involves a period of warm bulk fermentation (maybe 2-4 hours at room temperature, often including those ‘stretch and folds’ mentioned earlier to build structure) followed by a long, slow fermentation in the refrigerator (often overnight or even longer). This cold stage, sometimes called ‘retarding’, doesn’t just offer fantastic scheduling flexibility (mix today, bake tomorrow!); it significantly enhances flavour complexity as different enzymatic activities continue slowly, and it results in a dough that’s often firmer and easier to handle and score the next day.
What’s truly fascinating is the science behind that incredible sourdough flavour. It’s not just about ‘sourness’. Research, like the study mentioned by Pour la Science, has identified numerous compounds – various acids like acetic and lactic acid, ions like sodium and potassium, sugars like fructose, and a whole host of volatile aromatic molecules (like vanillin and hexanal) – that all contribute to the complex taste and smell we associate with authentic Pain au Levain. This intricate flavour profile, developed through slow, natural fermentation, stands in stark contrast to the often one-dimensional character of mass-produced breads made using accelerated processes that prioritize speed over flavour development, a distinction highlighted by Le Cordon Bleu. This slow process might even make the bread easier to digest for some, as enzymes have more time to start breaking down gluten.
Bringing Your Loaf to Life: Shaping, Proofing, and Baking
After the bulk fermentation, when the dough feels airy, alive, and has increased noticeably in volume (often by 30-50%, though recipes vary), it’s time to shape your loaf. This step isn’t just about making it look pretty; proper shaping builds surface tension, which acts like a ‘skin’ helping the loaf hold its form and rise beautifully upwards in the oven (this dramatic rise is called ‘oven spring’). Whether you’re aiming for a classic round boule or an oblong bâtard, the goal is to create a taut surface without degassing the dough too much – we want to keep those lovely air bubbles! Don’t be discouraged if your first few attempts aren’t perfect – shaping definitely takes practice, and even small errors can show up in the final bake. Working with cold dough from the fridge often makes shaping easier.
Once shaped, the dough needs its final rise, or ‘proofing’. This is where the dough rests and accumulates more gas before baking. This can be done at room temperature for a couple of hours, or, very commonly with sourdough for flavour and convenience, in the refrigerator overnight (this is called cold proofing or retarding). Proofing is often done seam-side up in a ‘banneton’, a wicker or cane basket (usually lined with cloth and dusted well with flour, often rice flour to prevent sticking) that supports the dough and often imparts a beautiful spiral pattern onto the crust. Using a banneton helps the loaf maintain its shape during this final stage, as noted in guides like the one from Busby’s Bakery. Cold proofing has the added benefits of developing even deeper flavour and making the dough firmer and significantly easier to score just before baking. To check if your dough is ready after proofing, you can use the ‘poke test’: gently press a floured finger into the side of the loaf. If the indentation springs back very slowly, leaving a slight impression, it’s likely ready. If it springs back immediately, it needs more time. If it doesn’t spring back at all, it might be over-proofed.
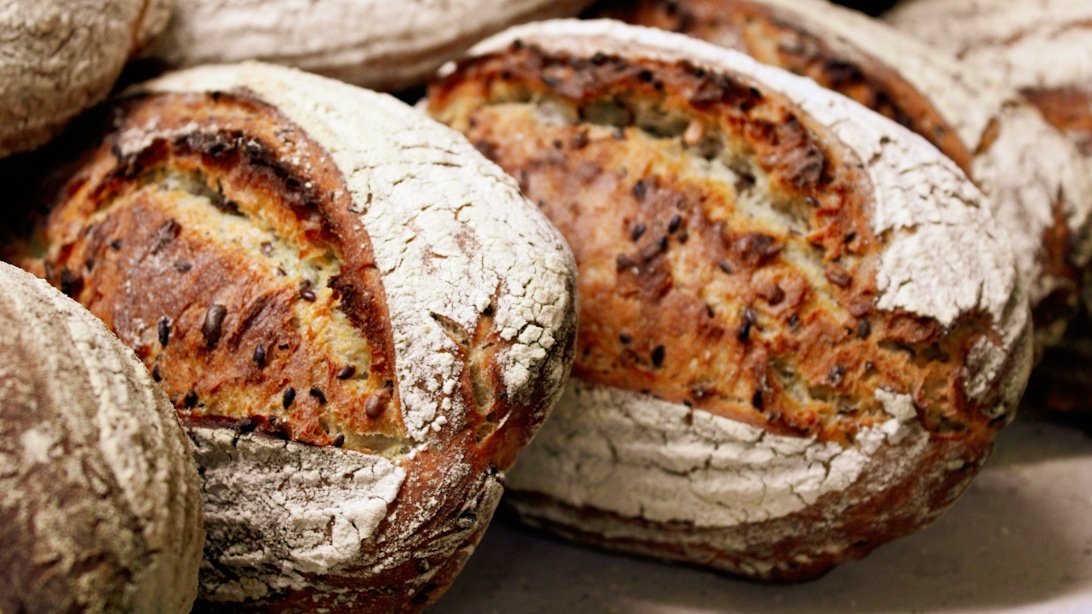
Scoring – making decisive cuts on the dough’s surface right before it goes into the oven – is crucial. It’s not just decorative; it allows the loaf to expand in a controlled way during baking, preventing it from bursting open randomly and helping to create that coveted ‘ear’ – the raised, crisp flap of crust that’s a hallmark of great sourdough. You’ll need a very sharp blade (a simple razor blade mounted on a handle, called a lame, is ideal) and a confident, swift hand. Scoring cold dough is much easier than scoring room-temperature dough, which tends to drag and snag.
Finally, the bake! Authentic Pain au Levain thrives in a hot, steamy environment initially. High heat (often starting around 230-260°C or 450-500°F) and steam are essential for maximizing that oven spring and developing a thin, crisp, blistered crust. Many home bakers achieve fantastic results using a preheated Dutch oven (a heavy, lidded pot), which traps the steam released by the dough itself, creating a perfect little steam chamber. After the initial steamy phase (perhaps 15-25 minutes), the lid is removed, and the temperature might be lowered slightly (say, to 210-230°C or 410-450°F) to allow the crust to brown deeply and the interior to cook through fully without burning. Methods inspired by bakers like Raymond Calvel often emphasize this initial steam phase, as detailed by Northwest Sourdough. Some recipes, like those adapted by Peter Reinhart, even offer flexibility, allowing for methods using just the natural starter or incorporating a tiny amount of commercial yeast alongside it for a slightly different timeline or flavour profile. Regardless of the exact method, aim for a deeply caramelized crust (what the French call ‘bien cuit’ – well cooked) and an internal temperature around 96-99°C (205-210°F) measured with an instant-read thermometer to ensure it’s perfectly baked through.
Embracing the Journey: Patience, Practice, and Intuition
If there’s one piece of advice I could offer as you embark on your Pain au Levain journey, it’s this: be patient with yourself and the process. Sourdough baking is as much about developing intuition and listening to your dough as it is about following a recipe precisely. Your starter will behave differently depending on the temperature in your kitchen, the flour you feed it, and even the time of year. Your dough will feel different based on the day’s humidity or the specific characteristics of your flour.
Don’t be afraid to get your hands dirty and really feel the dough at each stage. Notice how it changes from sticky and shaggy just after mixing to smooth and elastic after developing gluten. Pay attention to how it feels during stretch and folds – is it building strength and resistance? Observe how it rises during bulk fermentation – does it feel airy and full of life, jiggly when you gently shake the bowl? Learn to trust the ‘poke test’ during the final proof more than the timer on your phone. These sensory cues, as emphasized by bakers like those following the instinctive Poilâne approach, are invaluable.
There will inevitably be bakes that don’t turn out exactly as planned. Perhaps the crumb is a bit dense, or the crust didn’t get that perfect ‘ear’. Please don’t see these as failures! Think of them as learning opportunities. Each loaf teaches you something new. Maybe the dough needed a little more fermentation time, or perhaps it was slightly under-proofed. Maybe your shaping could be tighter next time. Keep simple notes if it helps, trust your observations, and adjust your technique for the next bake. As sourdough expert Kristen Dennis advises (mentioned in the Serious Eats guide), practice is key – bake those loaves, compare results, become your own kitchen scientist! The satisfaction of finally achieving that beautiful, delicious loaf, knowing you guided it there through understanding and care, is truly immense. It’s a connection to a timeless craft, a delicious reward for your patience, and a wonderful way to bring the heart of French baking into your own home.


Leave a Comment